Saving All Maps
This feature enables saving all Maps as graphic files in a specified location, as a single operation. Even Maps that are not currently displayed in the workspace are saved.
Specific Maps can be included or excluded by enabling or disabling them, respectively, using the Object Directory. Maps are saved for the current playback or recording time when this feature is used.
The manual procedure is described below but can also be invoked automatically using the Timeline (please see Maps Track Events). This procedure assumes the simulation has run to the desired time and that the Maps to save had been activated before starting playback/recording.
To save all Maps:
- On the Analysis tab of the Object Directory, ensure the Maps to be saved are active.
- Right-click in the workspace and select Save All Maps or select File > Save All Maps.
- Click the Location browse
button
 and specify a location.
- Select one of the available file formats:
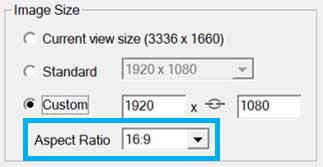
- Select the Image Size:
- If using a custom size,
aspect ratio controls are visible in the dialog:
- Select an aspect ratio option from the Image Aspect Ratio drop-down.
- To enter an aspect ratio that’s not listed, select the Custom option.
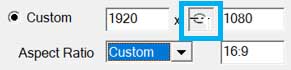
- Sizes and aspect ratio
can be linked when using a custom aspect ratio.
- When the sizes and aspect ratio are linked, changing one dimension automatically updates the other dimension such that the aspect ratio is always respected.
- When the sizes and aspect ratio is are unlinked, they are independent and changing a dimension automatically updates the custom aspect ratio. The other image dimension is not changed.
- To link or unlink sizes and aspect ratio, click the button between the X and Y size boxes:
- The icon or button here indicates whether sizes and aspect-ratio are linked:
- Set the preferred image size, remembering the above rules about linked/unlinked aspect ratios.
- Select a View:
- Click OK.
- A progress bar is
displayed as the Maps are saved.
Note: Default sizes and format are declared in the Cameras, Images, Videos and Maps tab of the Simulator Project Settings dialog. See the Camera, Image, Video and Map Defaults topic for details.
- A progress bar is
displayed as the Maps are saved.


 this icon (not a button) means
sizes are linked to the aspect ratio and cannot be unlinked.
this icon (not a button) means
sizes are linked to the aspect ratio and cannot be unlinked.
 this button means sizes and
aspect ratio are linked, but they can be unlinked.
this button means sizes and
aspect ratio are linked, but they can be unlinked.
 this button means sizes and
aspect ratio are not linked, but they can be linked.
this button means sizes and
aspect ratio are not linked, but they can be linked.